Estimated reading time: 4 minutes
Table of contents
- 1. Introduction
- 2. Essential Equipment Checklist
- 3. Tools and Accessories You’ll Need
- 4. Pre-Installation Preparations
- 5. Finding the Perfect Location
- 6. Installing the Starlink Dish
- 7. Routing the Cable Indoors
- 8. Setting Up Indoor Wiring and Ethernet
- 9. Connecting to Starlink via the App
- 10. Activating Your Network
- 11. Software Updates and Calibration
- 12. How Satellite Switching Works
- 13. Running Speed Tests
- 14. Verifying Device Connectivity
- 15. Starlink in Mobile and Outdoor Scenarios
- 16. Final Thoughts
- Real-World Examples
1. Introduction
Starlink is revolutionising internet connectivity, particularly in rural and underserved areas. This guide provides a comprehensive, user-friendly walkthrough of the Starlink installation process, highlighting both business and residential setups. Whether you’re a tech-savvy homeowner or an IT professional, these practical steps and expert tips will help you achieve a successful installation.
2. Essential Equipment Checklist
- A smartphone with strong 4G or 5G coverage
- The Starlink app installed on your device
- Starlink kit (including the base stand and dish)
- Optional: Starlink Ethernet Adapter for wired connections
- Ethernet switch (for multiple wired devices)
- Ethernet cables
- Power adapter
- Optional mounting pole for wall or rooftop installations
3. Tools and Accessories You’ll Need
- Power drill and assorted drill bits
- Ladder for elevated installs
- Cable rods for threading cables
- Silicone sealant for waterproofing
- Cable ties for neat cabling
4. Pre-Installation Preparations
Before starting, ensure all tools and Starlink components are in working order. Check for adequate sky visibility to optimise satellite connectivity.
5. Finding the Perfect Location
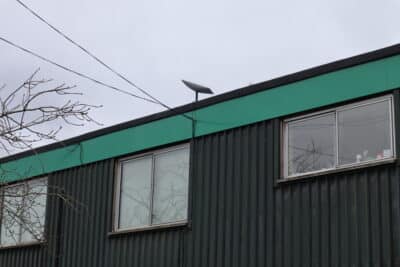
Choose a location with a broad, unobstructed sky view—free from trees, tall buildings, or other obstructions. Flat rooftops or gable ends are ideal. If using a mounting pole, ensure it is compatible and securely attaches to the Starlink dish.
6. Installing the Starlink Dish
Secure the dish using the pre-drilled mounting base. Apply silicone around drilled areas to prevent water ingress, especially when mounting on rooftops or walls.

7. Routing the Cable Indoors
Drill an appropriately sized hole to accommodate the T-shaped Starlink cable connector. Wrap the connector with electrical tape to protect it during installation. Use cable rods to guide the cable through walls efficiently and safely.
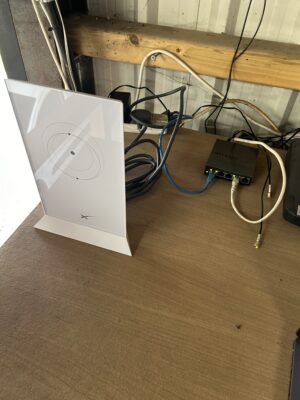
8. Setting Up Indoor Wiring and Ethernet
Once the cable is routed inside:
- Remove protective tape and connect the T-connector to the Starlink router.
- If using the Ethernet adapter, connect it before attaching the T-connector.
- Link the Ethernet adapter to a switch to distribute connectivity across multiple wired devices.
9. Connecting to Starlink via the App
Download the Starlink app, then:
- Connect your smartphone to the default Starlink Wi-Fi signal.
- Follow the prompts to create a custom network name and password.
- To prevent future VPN conflicts, set a DHCP range outside of the commonly used UK defaults (avoid 192.168.0.x and 192.168.1.x).
10. Activating Your Network
Sign in using the credentials linked to your Starlink account. This authenticates your connection and allows the system to sync with Starlink’s satellite network.
11. Software Updates and Calibration
Initiate any pending firmware updates before calibration begins. Updates typically take 30–60 minutes. Once complete, allow up to six hours for full satellite calibration—interference during this process can hinder performance.
12. How Satellite Switching Works
Starlink connects to 3–4 satellites intelligently simultaneously, much like a mobile device switching between cell towers. As of February 2024, 5,438 satellites are in orbit, with 5,402 operational, ensuring strong and stable connections globally.
13. Running Speed Tests
Use the Starlink app’s built-in speed test to check performance. For comparison, run the same test on a laptop connected via Ethernet. Expect some variance during initial calibration.
14. Verifying Device Connectivity
Ensure all wired and wireless devices are connected to the new Starlink network. For Power over Ethernet (PoE) setups, confirm that phones and access points are powered and functional.
15. Starlink in Mobile and Outdoor Scenarios
Starlink is perfect for mobile setups. In one case, a night navigation event used Starlink for live GPS tracking via Ordnance Survey apps. All that’s needed is power and a clear sky view—ideal for rural events or emergency response situations.
16. Final Thoughts
Starlink offers an efficient, future-proof internet solution for homes and businesses in areas with limited infrastructure. A carefully planned and well-executed installation will ensure fast, reliable service wherever needed.
Real-World Examples
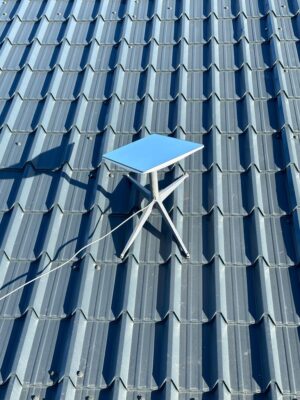
- Starlink dish mounted using the standard four-leg base
- Router powered in a remote barn setup
- The cable is cleanly threaded through the building structure for seamless connectivity.
This user-friendly guide is designed to simplify the Starlink installation process and empower users to unlock the full potential of satellite-based internet connectivity.
2nd Line Engineer at Iconology Ltd